Thursday, August 11, 2011

DIY Chamber Vacuum Sealer

Like many other food geeks out there, I long ago put together a DIY sous vide rig. Mine is particularly less elegant than the one linked there, but functionally it works well.

IMG_6010

But if the sous vide is the Ying, a good chamber vacuum sealer is the Yang.
Without a chamber, you can't vacuum anything with liquids. Also, you're not able to use techniques that rely on the compression (think watermelon) or degassing (think un-bubbled sodium alginate solutions) effects of the vacuum.

Unfortunately, retail chamber vacs ($1k-$5k) make retail sous vide machines look cheap..... so it was time to build one.


Main Parts List:
  • 10' x 10" x 1/4" Cold Rolled Steel Sheet ($100)
  • 2 Stage HVAC Vacuum Pump With R12 (Freon) Inlet ($150)
  • 5mm Impulse Sealer ($50)
  • 12" R12 - R12 Hose ($10)
  • Vacuum Gauge (or boost/vacuum gauge) ($10 ebay)
Accessories Part List:
  • 14mm to R12 Adapter
  • 1/4" x 1/2" x 10' Weatherstripping
  • 1/4" NPT Ball Valve
  • 1/4" Male to Male NPT Coupler
  • Large Gauge Extension Cord
  • 12-24 x 2" Bolts with nuts
  • Crimp On Electrical Connectors
  • 1/4" OD PVC Pipe
  • JB Weld - Quick Set
Assembly:
Step Zero- Find someone that can weld!
For me, that came by way of my friend Seth (who graciously helped with this crazy project).

He used a 110v MIG welding machine, Cutting Torch and an 8" angle grinder for the majority of the work.
2011-07-02 at 11.25.19

Step One
He cut the 10" Steel at 4x 19" (sides, top and lid), 2x 10" (end sides) and one remainder piece for the bottom. Then he used the angle grinder to put a 45 degree edge on all four of the "side" pieces. Using the torch, he cut a huge hole in the "top" piece where it left only 1" border on all sides.

Step Two
Using magnetic 90 degree wedges, he welded on the long sides to the bottom and then the short sides.
Then he welded the top "cut out piece" to the top of the box.
2011-07-02 at 10.39.35

Step Three
Drill and Tap holes for the suction ("14MM" used 12.5 x 1.5mm tap), release( 1/4" NPT Tap) and gauge (1/8" NPT Tap).
Note: The size for the drill bit will be less than the size of the tap. I had a bit set in 64ths from 1/16" to 1/2" and it did the trick. Use teflon tape and screw in those three items.
Drill two holes that will fit your PVC pipe through.

Step Four
I used the JB Weld to make airtight insulators around the 2" bolts.
The picture in this case is worth 1000 words.
I then stuck those connectors through the box and used the JB Weld on the PVC into the box.

2011-07-17 at 17.13.43

Step Five
Using the weatherstripping, I applied one long piece, starting in the middle of the long side of the box. I made the radius of the corners as large as I could. I overlapped the end by a smidge and pressed it against the starting edge. This, somehow, seals it just fine.

Step Six
I hooked up the vacuum pump with the R12 hose to the box.

Step Seven
I put an eye bolt into the swing arm of the sealer so I could tie it down with string.
I placed the impulse sealer into the box and plugged it into the sealed power connections.
The sealer is set at 8 of 10 power.

A Note on Bags
"Real" chamber vacuum bags work best. The bags for an external vacuum sealer were hit or miss.

Using the Vacuum
Vacuuming is pretty easy.
Prepare the bag like normal.
Place in the sealer's opening, lower the arm and tie with string.
Place the lid on the box, close the relief valve and fire up the pump.

It takes about 3 minutes to get most of the air out and up to 10 to make a huge vacuum.
This is due in large part to the size of the box. It's pretty big compared to some of the real chamber vacuums.


IMG_5998
2011-07-13 at 18.55.13
2011-07-02 at 15.49.46

Thursday, February 10, 2011

Chewable Cocktails, the Rare Idea

2 weeks ago I fire off a text message to Zack, who writes the better posts on this site, saying "What if we made our suspended cocktails spheres not so suspended, but actually chewable?" He wrote back stating he already had been thinking the same. I tipped him off to my idea and he shared his. We both agreed they sounded neat in concept. So...

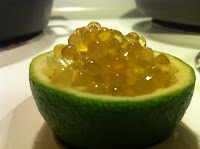
To the upper right is a whisky sour sitting in a lime rind bowl. I cubed lime which was then candied it in lemon and caramelised simple syrup. Afterwards I topped it off with whisky caviar. I at some point said, "I think we've invented a different drink class, cocktails you can chew" and yes, this is much better tasting and more skillful than jello shots. Some google-fu later, I could find nothing on the matter.

Then comes Eben Freeman, Mixologist, I've posted his video below. He makes an amazing White Russian out of Rice Crispies twice dehydrated in Kahlua, served in a cereal bowl with half and half, vodka and some other voodoo. Brilliant idea and more importantly, he invented "chewable cocktails" before we did. He also has a neat Margarita concept which is mostly just a jello shot sitting on top of one of the coolest lime crackers ever. After creating my whisky sour above, I made a toast to Eben and nommed it down.

Enjoy Eben Freeman below :)

Friday, February 4, 2011

Coffee and Cream


Coffee and Cream
Originally uploaded by Dash and Mrs. Dash
This one was an easy dessert that turned out very tasty.

The cream is:
1c Cream
1/2c Milk
1 Vanilla Bean cut and scraped
All of that was simmered for 15 minutes.

The coffee was 100ml Cafe Du Monde made in a french press mixed with 3tbps sugar and 1g sodium alginate and dropped into a calcium chloride bath.

Interestingly, some of the balls failed pretty quickly (a trend for me, it seems) but the ones that survived and then stashed in the cream lasted more than an hour.

For fun I also did some Jack Daniel's caviar on top to 'irish it up'.

Only thing left is to add some color to it.

Biscuit Cutter Eggsample

Biscuit cutters make great looking eggs.


Saturday, January 29, 2011

Homemade Veggie Stock, Cutting Food Waste

A couple weeks back I was processing some vegetables and cleaning the fridge. Typically I throw neglected vegetables away, ones that aren't rotten, but obviously not in serving condition and I have no plans for them or time. Let me add that this feels very wasteful all the time, so this time I threw in mustard, spinach and collared green stems, some old celery, bellpepper, onion, aging jalapenos and a few other things into a pot and boiled away. The stock came out really spicy, so I knew later I'd have to tone it down in halfsies portion.

This week is my first use of that veggie stock that cut my food waste down quite a bit. Pictured is a homemade cream of asparagus, with garlic and lemon juice puree, rare rib-eye, basmati rice pilaf with my jalapeno veggie stock and a parmesan cracker. Normally I don't make cream of asparagus and do just a puree of asparagus juice, which I wanted to try alginating, but I don't have all my tools yet. Here's to hoping you see that next time I post.

Back to cutting food waste... I have since started a repository bag for each week where I put
scraps that aren't edible. These then get collected into the freezer and in another week or two they'll be pulled out and made into a stock. Typically I freeze the stock in ice-trays and then bag it up, makes it easy to portion out what you need for specific meals. Here's an example picture
where I preserved some beer brat stock.

Now I just need a deep freeze.

Enjoy

Monday, January 24, 2011

Pea Soup with Carrot Caviar in a Bacon Ring

Peas and Carrots and Cornbread
My first attempt and incorporating a sodium alginate gelled item into a real dinner has worked. The Split Pea Soup was more or less standard. I used the "leftovers broth" from last week with split peas, onions, ham and ground coriander.

The carrot caviar was pureed carrot with sugar, salt and a little water. The hand blender did a fantastic job of getting the alginate into the water without becoming a mess.

The bacon ring in the picture is V2.0. I first tried making the rings around my ring molds in the oven. That led to a crazy sticky mess of baked on bacon that wouldn't come off.
For the second attempt I used a paper towel roll, covered in parchment and cut off the size of the round of bacon secured with a toothpick. Three minutes in the microwave and voila, bacon rings!


Bacon Ring

Sunday, January 23, 2011

Soft Boiled Egg


Eggs
Originally uploaded by Dash and Mrs. Dash
For my test run with the hacked up immersion circulator, I set a couple of eggs in and set the water to 146f. After an hour and a half, I crossed my fingers and cracked one open. Absolutely perfect. The white was just set and interestingly the yolk was a little more set, not runny but slightly gelled. I'd call experiment one a success.